I'm pretty excited about this one! So let's jump right in.
To recap, last I left you I had completed steps 1-7:
1 - Disassemble and Wash the Furniture
2 - Sand Everything with Medium Sand Paper
3 - Prime it
4 - Sand Everything with Fine Sand Paper
5 - Paint the Furniture
6 - Sand Everything with Fine Sand Paper
7 - Paint the Furniture
This weekend I finished steps 8-11
Step 8 - Spot Sand the Furniture with Fine Sand Paper
Since I already explained how to sand last time I wont bother boring you with this step again (boy am I glad it's over! Sanding is my least favorite step). The only difference is this time I didn't sand everything, I only sanded the areas that where a little lumpy or where the paint was too thick. I did sand the very top of the dresser completely because I want as smooth as a finish on top as possible.
Step 9 - Spot Paint the Furniture
I only painted areas that needed a third coat. Areas that looked a little yellowish (the color of the original piece) or places I had sanded. While I didn't repaint the whole thing, I did make sure that if I started painting a section I finished it. By this I mean that if a small area of a drawer face needed to be repainted, I repainted the whole drawer face. You don't want to just put a small circle of paint in one spot or when it dries it will look like a spot of paint instead of giving you a smooth finish.
As I originally said, not every piece of furniture will need steps 8 and 9. If you're going from white furniture to a light color you probably wont need this at all.
Make sure to wait at least 24 hours before moving on to step 10
Step 10 - Apply a Finish to the Furniture
Now it's time to protect all that hard work! After some careful online research I decided to go with Minwax Paste Finishing Wax. It's easy to use and it dries clear. Apparently some other brands sometimes have a really faint yellow tint, and since my furniture is bright white I really don't want that.
The can suggested applying with cheesecloth. Why is that? Because cheesecloth is very loosely knit together. You take a hunk of wax on a double thickness of cheesecloth and use that to rub down your furniture. The wax slowly seeps out through the cheesecloth giving you a nice thin layer and avoiding wax lumps.
How much do you put on the cloth? I just grabbed a small hunk of wax before folding the cheesecloth over. Always better to have too little than to much. It just means you'll have to refill your cloth more often.
If you've ever waxed your car this process will be really familiar. We just put the wax on and used a clean cloth to buff it off. Here's Julie (BFF - yes, we've been BFFs since 8th grad, I'm allowed to still call her that) helping me buff the drawers.
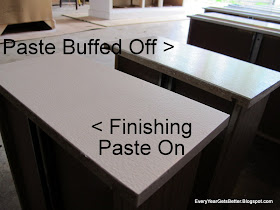
The instructions told us to wait about 20 minutes between applying the wax and buffing it off. We had so many pieces to work on that by the time we got applying wax to everything it was time to buff it off already. To show you what a difference it makes, here's a picture of one drawer that has the wax on it and one where it has been buffed off:
That's really the end of step 10 but we took a quick break between 10 and 11 to move the dresser inside. It was pretty hot outside so we were more than happy to finish the project in air conditioning.
Can you see how helpful I am at moving things! (What? Someone has to hold the camera!)
In the room it goes!
Step 11 - Reapply Hardware
A couple of tricks for this step - first, use a razor to scrap off extra paint that might build up in the corners inside the dresser. If you leave too much paint in the corners the drawers might stick.
The other trick - use a drill bit just a little smaller than the pre-drilled holes in your dresser to clean the excess paint out of the holes. You don't want to make the holes any bigger, just get the globs of dried pain that might have built up in them.
Next, you just put your hardware on! Well, this is the part where I was going to show you the beautiful new hardware I bought for this dresser....but after spending a considerable amount of time online I couldn't find anything that would work. I haven't given up, but I don't want to wait on the perfect drawer pulls to enjoy this new piece of furniture. So, what did I do? I went out and bought spray paint!
I want every drawer pull to be a different color, matching the stripes on the wall. So I bought 7 colors to use. I got home and immediately sprayed a big handle yellow, all excited and ready to go. Then I realized that the middle of the dresser is what I wanted to be yellow and I just sprayed the wrong thing....way to go Kris. All excitement, no planning...not smart. So I stopped and laid out the hardware on the ground to get the placement correct.
Then, using my scrap piece of plywood I painted the dresser on, I spray painted each piece of hardware.
I also sprayed the hinges white, since they were still yellow like the old finish.
To be honest, this was my first time using spray paint. I did ok...but they're not quite perfect. It's nice to know these aren't going to be the drawer pulls forever. I think I'm going to have to learn some more about spray painting before I attempt it again. It took 3 coats and I had to move stuff around to get all the angles. Most of the hardware turned out ok, but one piece was bubbly. I don't know if I didn't shake the can enough or if spray paint expires or something, but it's not as pretty as the rest.
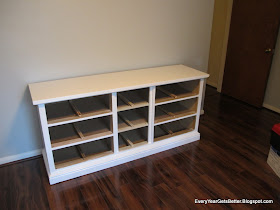
Overall, I'm pretty darn proud of how this little guy turned out.
Before:
After:
Pretty different, isn't it?
And look how cute it looks with the nursery accent wall:
You may be wondering about the night stand that I mentioned in the title. Well, I finished steps 1-10 on that one but I have to re-do the hardware (because of the premature yellow spray paint incident) and so I'll need to finish that one next weekend. But I'll be sure to show you when I do. I plan on making the pulls white since there are only two drawers.
Project Cost: Furniture - $180, Sanding materials - $20, Primer - Had on hand from other projects, Paint and painting supplies - had on hand from other projects, Spray Paint - $25.....Total: $225. I think that's pretty good. It's not a cheap project, but this dresser is really solid and should last us a long time. It's hard to find a solid wood dresser that's only $225, especially one that matches the room so well.
Time: Total about 10 hours, but you can only do about 2 hours of work at a time, which really makes this project stretch out over multiple weekends.
Difficulty: Medium to Hard. I'd say the difficulty level depends on the piece of furniture and your own experience level. While I wouldn't recommend this project to someone who's never painted anything before, I also would say that it's easier than it seems. If you're interested, I'd suggest getting something small from the thrift store to practice on. Something you wont care if you end up ruining.


YAY! It looks great! You did SUCH a good job, Kris! I can't wait to see it in person!
ReplyDeleteThanks Claire! I'm pretty pleased with how it turned out. Come and see it ANY TIME. :)
Delete