Without further ado... A project i started before painting the utility room was:
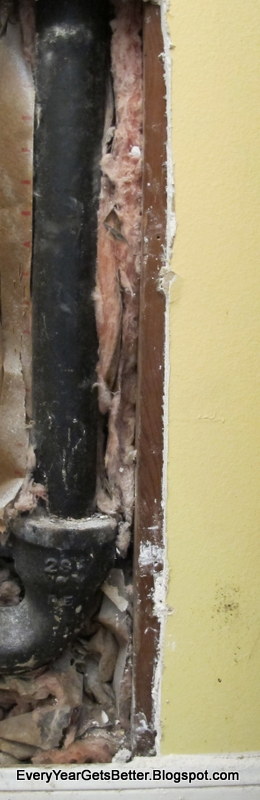
Patching this GIANT hole in our Utility Room wall:

Yuck, right? What is that from you're wondering? Well, we had our cast iron pipes replaced with PVC and apparently the plumber dudes didn't think we'd care if they left a big hole. Thanks guys. Silver lining: Gave me the opportunity to learn how to do this:

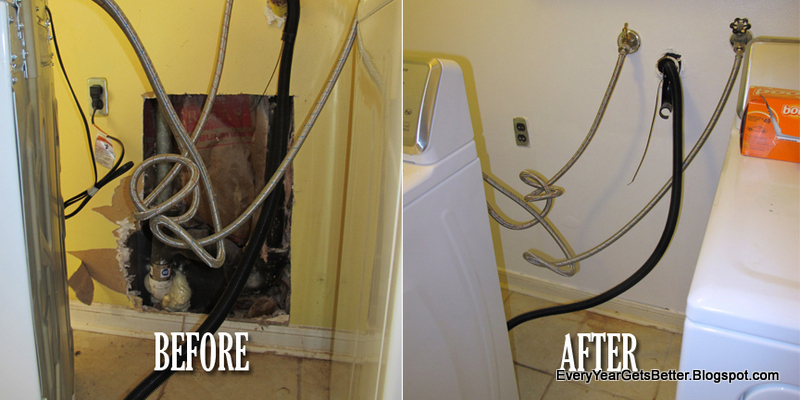
Pretty good, huh? Oh, that's another new thing I'm trying. I'm going to give you the before/after first, that way if you have no interest in the how you don't have to worry about scrolling over everything.
If you are interested... here's the how:
Step 1:
You need to make the hole bigger. What? Yes, I said bigger. Specifically, you need to uncover half of a wall stud. Luckily, they are pretty easy to see since you have a giant hole in the wall. Anyways, using a metal straight edge and a sharp box cutter we marked the section of the drywall we wanted to remove.

Then we went over and over that cut with the box cutter, making it deeper and deeper (and making a real mess all over the floor - if you have carpet, put down some plastic first!).

Eventually you can break away the drywall you want removed and you should be left with a fairly straight line revealing half your wall stud.
We repeated the same thing on the other side. Unfortunately the people who made the hole kind of ripped away the paper on the front of the drywall on the left side of the hole (hence the jagged marks).

Step 2:
Next you'll need to cut your drywall to be the same size as your new hole. To cut drywall it's best to make one long cut, and then cut the resulting piece down if necessary. Each cut can be made by measuring/drawing you guide lines (measure twice!) and then using the straight edge/box cutter combo down the entire board.

Then you can bend the board at your cut line and use the box cutter to cut through the paper on the back.

FYI, if you're wondering why you you haven't seen my hands yet... I hurt my wrist sleeping on it weird (I know... lame) so my father in law had to do a lot of the work on the first day.

Step 3:
The more accurate your measurements/cuts the more snugly your patch will fit into the hole. If it's not perfect that's ok.

Remember how we revealed half the stud on either side? Well, this is why. Next you secure your new drywall to the studs using drywall screws. We put one in every 6" or so.

Next, use some self stick mesh tape to cover where the old and new drywall meet. This will help keep your joint compound from just sinking into the crack every time you apply it. It also helps cover any gaps where the old and new drywall don't exactly fit perfectly together (We had a pretty big gap up top).


Step 4:
Time to apply the joint compound around the border. For this first layer use it pretty liberally, pushing it into any gaps (like ours at the top):
 I've already discussed joint compound and what tools I use during my post about repairing wall cracks, so be sure to check that out if you need more info.
Once you've put the joint compound all the way around this is the part where you step back and go "Oh God, that looks horrible. What am I doing? Why did I think I could do this myself?" At this point it looks like a mess.
 But have no fear! It get's only better from here. You'll need to let the compound dry completely, sand it, apply more, let it dry, sand it, etc. until it feels nice and smooth when you run your hand over it. Remember, as long as you don't feel anything then it will look good when you paint it, no matter how scary it looks right now. Here is what ours looked like when the last layer was completely dry. I'd like to point out two things. One, I used compound to fill in the place on the left where the paper had been torn and it turned out well. Two, you can't really see the yellow tape. If you can see it a lot chances are it's sticking up and will look bad when you paint.
 Now, technically the patch is done. Obviously this is ugly and you don't want to leave it like that, but all that's left is to paint everything. There was a week between the time we patched this whole and when I painted the laundry room, so for a week this is what it looked like:
 But eventually I painted that wall white and we get this pretty before-after:

Note: Even if you aren't changing the color of the wall, I would still paint the whole wall with a new coat of paint. Painting just one patch tends to look odd because the new paint will still stand out (cleaner/shiner than your old paint).
Cost: Well... we used left over drywall, left over joint compound and we already owned the tools... so nothing for us! (yay, we finally own enough stuff that not every project requires a purchase!)
Time; About two hours at the start, and then 15-30 mins a day to sand/reapply the joint compound (leaving 24 hours in between for things to dry). So total it was like 3 hours spread over three days.
Difficulty: Medium. It's not a project for a complete noob, but if you've ever used joint compound before consider this a good next step towards being a DIY pro.

Once you've put the joint compound all the way around this is the part where you step back and go "Oh God, that looks horrible. What am I doing? Why did I think I could do this myself?" At this point it looks like a mess.


Note: Even if you aren't changing the color of the wall, I would still paint the whole wall with a new coat of paint. Painting just one patch tends to look odd because the new paint will still stand out (cleaner/shiner than your old paint).
Cost: Well... we used left over drywall, left over joint compound and we already owned the tools... so nothing for us! (yay, we finally own enough stuff that not every project requires a purchase!)
Time; About two hours at the start, and then 15-30 mins a day to sand/reapply the joint compound (leaving 24 hours in between for things to dry). So total it was like 3 hours spread over three days.
Difficulty: Medium. It's not a project for a complete noob, but if you've ever used joint compound before consider this a good next step towards being a DIY pro.
No comments:
Post a Comment